2.2 Water Access and Irrigation
Water Access
Water on your property can come from a variety of places including directly from a river, well, part of a rain catchment system, stored in the soil, municipal water system, or reservoir. If you are using it to irrigate crops, it needs to be clean, and not polluted. If it is for washing produce and drinking water for animals, it also needs to be potable.
- Municipal/Band: Water through the municipality or Band will have been treated and is potable (safe for human and animal consumption). This water will be safe to wash produce with, feed to animals, and drink yourself, but you pay for what you use, so it can get expensive if you are irrigating or washing produce for hours.
- Rain catchment system: Rain barrels and larger containers can store water off of roofs. Keep in mind that every rain event might add a lot of water, and the amount of water you capture is limited by the size of your storage containers.
- Reservoir: If there is no water access on your property, it might be necessary to dig a pond on the property. Hiring an excavator, deciding what to do with all of the soil that was dug up, adding aquatic plants and a filtering marsh, and installing a pump will be important to keep the water clean for irrigation needs.
- Soil: Keeping your soils healthy and full of organic matter will store large amounts of water every time it rains. Water will drain through poor, sandy soils with little organic matter, and wash away nutrients.
- Surface water: This will come from large pipes up from the river, and works well for irrigation, but is not potable. Your water licence will dictate how much water you can take.
- Well: You might need to drill one or if there is an existing one, you will have access to a lot of water, though the quality might vary. Test the water annually to ensure it is being treated properly to not get anyone sick or damage crops.
At the end of the day, your water system might be different from your neighbors, any system will need to have sufficient water for the scale of your operation, and be reliable year-round.
Irrigation
Depending on your enterprise, your water and irrigation needs will be different, but no matter what you are doing, you will need to be able to get water to the right place at the right time. Water is SO important, especially in our hot and dry climate; you can lose plants in a matter of hours if they are not getting sufficient water, with months of work going to waste. Of course animals need fresh water daily, and sometimes twice a day in the summer heat.
Before you buy your animals and your seeds, spend time figuring out how you will get water where you need it. You do not want to design a space (refer to section 2.0 Property Design) where you have to walk far with buckets of water or drag heavy hoses around.
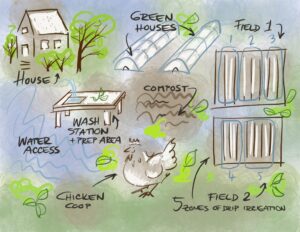
Think about where you need water on your property: house, greenhouse(s), wash station, animal paddock/coop, and in the fields. The drawing below shows all of the buildings in this example that need water, as well as the fields.
Garden Design
Zones: Consider the needs of the plants when you plan the fields; crops that need more water should be planted together in the same zone, and those with lower water needs should be in the same zone. You also need to consider the soil type, sun exposure, crop rotation schedule, and any seed saving considerations (keeping distances between plants that will cross-pollinate) when planning the field!
Row sizing: Consider the length of the rows, and the distance between rows. You need at least 18″ between rows for space to kneel and weed, and push a wheelbarrow through. If you are going to mow between the rows, then make it the width of your lawn mower’s wheelbase. Weed whacking between rows is not recommended; it covers your plants in debris, and it is very easy to damage plants that hang into the rows. If you are going to plant something specific between your rows, then think about how the path will be watered.
Bed sizing: When planning the length and width of your beds, consider what your plant spacing will be, and what your irrigation system will allow. The length of your row will depend a bit on your field size, but likely be less than 150ft. By standardizing the bed size, it is easier to reuse irrigation equipment. The width of your bed should be no more than 75cm (30″) across, as that is what you can comfortably reach from both sides. Depending on the crop, you can plant 1-3 rows in each bed. Keep in mind that dense plant spacing will reduce the amount of bare soil (and weeds). Note that standardizing the size of your beds will keep everything more simple for crop rotation, planning, and equipment sizing, e.g. 100ft beds, 30″ wide, with 18″ pathways between them.
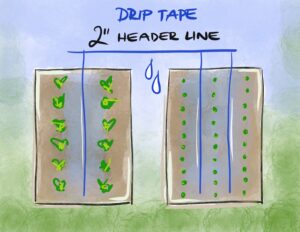
There are several irrigation stores in the area, so it would be worth to go to the store and have them help you map out your irrigation system. You will likely be making adjustments for a few years, and irrigation can get expensive, but you will save a lot of time and money in the long run by investing in proper equipment. Possible irrigation options include drip tape, small sprinklers, or pivoting irrigation lines. You might use one type or a combination, depending on how you mulch your beds, and your weed management system. See two examples below:
-
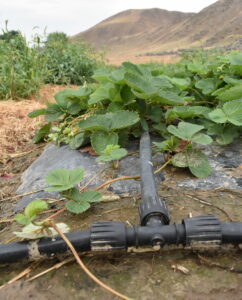
- Plastic mulch with straw in pathways
-
- Mini sprinkler on a 1 3/4″ pipe, 18″ spacing at Uncle Freddy’s Hothouse
Drip tape: Drip tape is a plastic tube with small slits along one side (usually it has blue stripes so you can tell where the water comes out of). It waters plants slowly at their roots, minimizing water consumption, and not damaging the leaves of plants (which overhead watering does). For your system, you will need to buy a roll of drip tape, a roll of header line, a drip tape adapter for each row, all pictured below. If you have a high pressure system, you might want the drip tape adapter with flow control. You do not need to buy the pieces for the end of the drip tape, a simple tight knot is sufficient or folding it over itself and using a short piece of drip tape to hold it in place. You might also want connections like in the photo above, or you can pierce a hole in the header line with a special tool and connect it directly. Here is a video with some tips for installation.
-
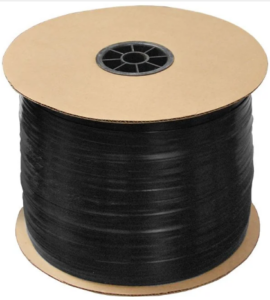
- Roll of drip tape
-
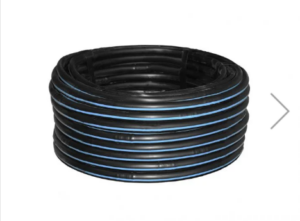
- Roll of header line
-
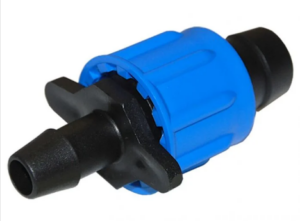
- Drip tape adapter
-
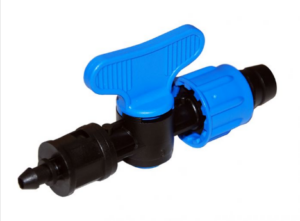
- Drip tape adapter with flow control
When installing the drip tape, turn on the water first to make sure there are no holes and see how wide the drip tape waters; some farms gets 6″ on either side, some get 4″, depending on the water pressure. You will also need to experiment with the pressure running through the lines; too little pressure won’t water plants at the end of the drip tape line, and too much will blow the line off. Testing the irrigation system will take several hours at the beginning of the season, but will save you a lot of time throughout the growing season.
Plastic mulch: You can lay plastic mulch (purchased in large rolls from agriculture supply stores) on top of the drip tape, landscaping fabric (burn holes for each plant to reduce fraying instead of cutting holes), or mulch crops with straw or leaf debris. Plastic mulch works very well to suppress weeds, keeps the soil warmer under plants like tomatoes and peppers that need heat, and can be easily cut with a knife to make small holes when planting transplants into it (you can also plant seeds, but the small seedlings are shaded by the plastic and don’t grow as well as transplants which are higher than the plastic). It is hard to reuse though, and cannot be recycled. There are some biodegradable plastic mulches, but some farmers found they didn’t last for the whole season, and the field was full of small pieces of plastic at the end of the year (which eventually broke down, but took a while).
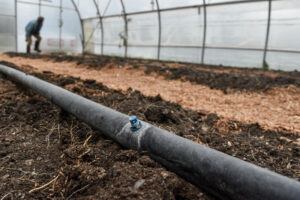
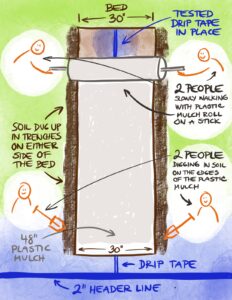
If you use plastic mulch, lay the drip tape lines underneath first, before digging it in with the help of some friends, four people is ideal, the more the better though. You can buy 48″ plastic mulch from agriculture supply stores (for example Growers Supply Co), which gives you enough overhang on each side to maintain 30″ beds. First, dig trenches on either side of the bed (one large shovel of dirt is likely sufficient), then once the mulch is laid tightly on top, dig the soil back on the mulch. Maintain a straight line, and keep the plastic mulch taut.
Sprinklers: Sprinklers have a wider range than drip tape, and can be reused every year if treated properly. There are a wide range of sizes and heights that sprinklers come in, so going to a store and talking to the irrigation specialists might help you figure out what you need. You can find mini sprinklers that connect directly to the header line (1-2″ in diameter) and be placed directly on the ground (like in the photo above), or you could attach them to stainless steel rods or PVC pipe (4ft height works well). It depends on the needs of your plants, and the pressure of your irrigation system.
Pivot irrigation: Used for larger areas like pasture for animals.