3.1 Land Management Practices
Soil Amendment Calculator
To help you figure out how many nutrients you need to add to your soil, you can use the BC Nutrient Management Calculator. Using the Calculator, you can add the previous year’s cover crops, any compost/manure/fertilizers that were added, the results of the soil analysis, and it will calculate the nutrients you need for that particular crop.
For example, crops in one field of your farm are not growing very well. You have the soil test results, but are not sure what else you need to add to the field to improve the soil for the potatoes you want to grow there. Using the Calculator, you find that the chicken manure you added is not providing enough nitrogen, and exactly how much more you need to add to the soil for the projected yield of potatoes.
If you want to be create new beds, to really build the soil, it can take four years of planting various crops:
- Year 1: Plant potatoes (to condition soil)
- Year 2: Plant beans (to add nitrogen)
- Year 3: Plant root vegetables (aerate the soil)
- Year 4: Plant the desired crop!
Soil Management Practices
How can you build the soil?
- Cover crops
- Mulch
- Add manure / livestock
- Compost
- Weed management
1. Cover Crops
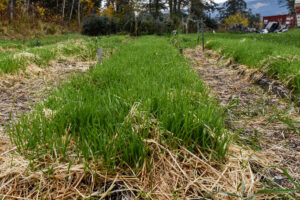
Fall Rye is a popular cover crop to plant in areas that you will be growing crops in the following Spring. Seed Fall Rye in the Fall, then in the Spring, once it is no more than 6″ high, mow or weed whack it down really low, leave the clippings on the soil (informally referred to as ‘chop and drop’). Alternatively, after trimming down, you can fork it over and flip upside down, and let it break down for 6 weeks, thereby adding nutrients to the soil. You can also till it into the top 6″ of soil, but this can harm your soil structures and microbes, so only till when necessary. The ares cannot be planted immediately, it needs a few weeks to break down. Avoid planting Rye in areas where you are planting root crops.
Other cover crops include cereals like Oats, Buckwheat, etc. You can also mix legumes in like Peas, Beans, Soy, Alfalfa, and Clover to fix the nitrogen in the soil.
2. Mulch
One of the soil principles is to keep the soil covered, and mulch is something that you can use to prevent the soil from being bare. Keeping soil covered suppresses weeds, absorbs and stores water, protects soil, and decomposes into a valuable soil.
Living or green mulches refer to crops that are growing (e.g. cover crops) which work in pathways, in crop rotation practices, over the Winter, or preparing fields for future crops. You can also use many non-living materials as mulch including grass clippings, straw (not hay), aged manure, weeds that have not gone to seed, wood chips, leaves and twigs, cardboard, newspaper, and more. Plastic mulch is used by many farmers in our area as well, which works very well to keep the soil moist and suppress weeds, but does not build organic matter or contribute to soil health.
-
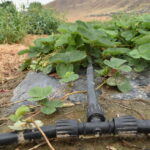
- Plastic mulch with straw in pathways
-
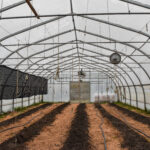
- Greenhouse in November
-
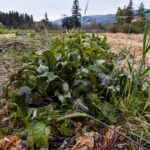
- Straw under plants and in pathways
If you need to build to build new beds, a technique called layer mulching or lasagna beds, using the resources you have already or are nearby. Alternate carbon (C) and nitrogen (N) layers in the beds; carbon-based (“browns”, leaves, cardboard, straw, wood chips) and nitrogen-based sources (“greens”, sod, manure, fresh leaves).
Layer mulching
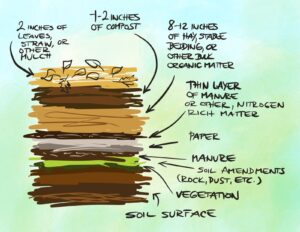
To prepare beds for growing in lawn or bare soil:
- In the exact place that you want to grow, cut out any pieces of turf that are growing.
- N: Flip the turf upside down (roots up) – this has a lot of nitrogen and nutrients in it, so it does not need to be removed
- C: Cardboard or thick newspaper on top of the areas you do not want grass to grow so it blocks out the light and adds carbon, make sure this to wet the cardboard after putting it down
- C: Wood chips (mix of leaves in the branches, leaf mold, deciduous leaves and conifer, breaks down faster)
- N: Manure (sheep, goat and llama are good to use fresh); aged manure (cow manure has few weed seeds; horse manure is good); really aged chicken manure (can burn the plants if used before two years)
- C: Spent straw (bonus if there is feces, urine, has been rained on, and trampled on), wool works well too
- Soil (may be purchased, great local soil is from Westwold View Farms, 15 yard minimum order)
- Top dress with C: Leaves (it works well if they are chopped up with a lawn mower) or straw
3. Adding manure/livestock
One tool can be to integrate livestock, which is a large component of Regenerative Agriculture. If you are harvesting crops, you have to add nutrients back in, and it can be difficult to add enough nutrients from just plants alone (e.g. cover crops) if you don’t want to add chemical fertilizers (these do not add organic matter and can really fluctuate in price and availability). If you don’t have animals, you can buy local manure, which will add to the nutrients and organic matter in your soil. You are also working towards being self-sustaining; one of the benefits of diversification is creating your own inputs and not being as dependent on outside sources.
4. Compost
Building an effective compost system at your farm is a big part of building up your soils, and returning nutrients back to the soil. Consider all of the produce that you can grow on your field and how much needs to go back into the soil (check out the BC Nutrient Management Calculator for more on this).
There is a lot of information on building and maintaining a compost system, but the basics are to add about two-thirds browns (C) and one-third greens (N), ensure it gets enough water, and mix it enough to prevent it from digesting anaerobically. You can inoculate it with microbes from a neighboring compost pile, or find some bokashi bacteria if you are interested. It can get quite technical to do it properly, and if you find that it is outside of your capacity, you can purchase commercial compost.
5. Weed Management
If you are using the soil health principles like having no bare soil, mulch, drip irrigation, and no or low-till practices, you are disturbing and watering the weed seeds as little as possible. You will always have weeds though! Here are some weed management tips from The Market Gardener.
Depending on your crops, there are different techniques for managing them including:
- Tools like a saddle or wire hoe are very useful for walking down the bed and weeding plants
- Inter-plant crops (e.g. planting lettuce in between cabbages so by the time the cabbage is ready in the summer the lettuce will have been harvested)
- Place black silage tarps in beds for 2-4 weeks to cover the soil to allow weeds to sprout then die, before planting the area with desired crop
Keep in mind that weeds are indicator plants of what your soil needs. For example, if you have a problem with Hairy Vetch, a nitrogen-fixing plant, when you know your soil is low in nitrogen. Another common example are Dandelions, which is a dynamic accumulator with a long taproot. Dandelions show up in compacted, poor nutrient soil (e.g. lawns); the long tap roots creates pathways for air and water, and mine nutrients that aren’t available on the surface like magnesium, calcium, and boron. They pull these micronutrients to the surface, then store them in their leaves, and at the end of the season the leaves die, the nutrients are now available to other plants on the surface. They are pretty amazing!
Rotational Animal Grazing & Regenerative Agriculture
The practice of integrating livestock into your farm is often referred to as Regenerative Agriculture. The book Regenerative Agriculture: A Practical Whole systems Guide to Making Small Farms Work by Richard Perkins is an incredible resource if you are interested in learning more. There is also an overview of Regenerative Farming by Young Agrarians here.
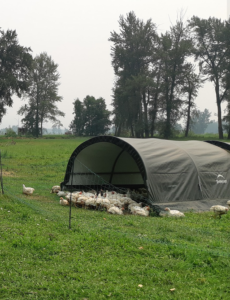
Rotational animal grazing is essentially having animals out on pasture, and moving them every 1-3 days with portable electric fencing. It keeps the animals on a high plane of nutrition, and prevents overgrazing of the grasses. Not only is it good for the animals, but also the plants; the grazing encourages them to grow their roots, which stores more carbon in the soil, and feeds the soil biology.
After the animals have fed on the area, run the sprinkler over the pasture, and the manure will break down in no time, restoring the pasture.
“From the time a plant is bit, it takes about 3 days to start recovering, so you don’t want animals to stay more than 3 days, as on day 3 it will start growing again; if the animal eats it again at day 3, then the plant is overgrazed. If you keep them in a smaller space, the animals will evenly graze the area instead of just eating the most delicious ones.” – Dezmond Allen (Regenerative Pasture Systems)
Till vs No-Till Practice
Tilling (or breaking up the soil) has been a common agricultural practice, but scientists are learning more about the impacts to the soil structure when tilling is done too frequently. Essentially, tilling with a tractor breaks up the soil and plants, aerates it, makes it easier for water to flow through and plant in. Unfortunately what also happens is that organic matter breaks down faster, and releases carbon into the atmosphere. Mechanical tillage also physically breaks up the structure of your soil, so you do lose some soil.
In BC, most of our soils are fungal-dominated (fungus grows in forest soils, while bacteria grows in grassland soils). The soil mycorrhizae are an important component of plant health; when the soil is tilled, these symbiotic relationships are disrupted. If the soil is not tilled, the soil will store more carbon, more organic matter will be be in the soil, the soil structure will be kept intact, and more of that mycorrhizae will grow and give nutrients with your crops.
How do you create the best environment for your plants to thrive? Depending on your soil texture, you might have to incorporate different tools along the way, including adding compost, planting cover crops, and mulching.
Integrated Pest Management
When planting crops, you can plant flowers between your crops like marigolds, nasturiums, mint, sweet alyssum (especially around brassica to repel aphids), calendula, and more. This inter-planting technique works well to attract both pollinators and repel pests.
This helpful Integrated Pest Management guide was created for the Deh Gáh Got’ı̨ę Community Garden program by Shay Paul.